Quickstart
Install k8s-autopilot, connect the UI, configure your AI provider, and run your first task
k8s-autopilot is an AI operations agent for Kubernetes. It runs as a Docker Compose stack with a web UI — you talk to it in the browser, and it connects to your cluster to get things done. This guide covers the one-line installer (recommended), manual Docker Compose setup, and running from source. For a full feature overview, see the Overview.
Install and Run Your First Task
1. Install
Run the official installer in your terminal:
curl -LsSf https://raw.githubusercontent.com/talkops-ai/k8s-autopilot/main/scripts/install.sh | bash
The installer checks prerequisites (Docker, Docker Compose, port availability, kubeconfig), pulls the latest images, and starts the stack. Everything is installed to ~/.k8s-autopilot/.
Run inside WSL (Windows Subsystem for Linux) for full compatibility with Docker sockets and cluster networks.
2. Open the UI and Connect
Open http://localhost:8888 in your browser. You'll see the Connect to Agents screen:
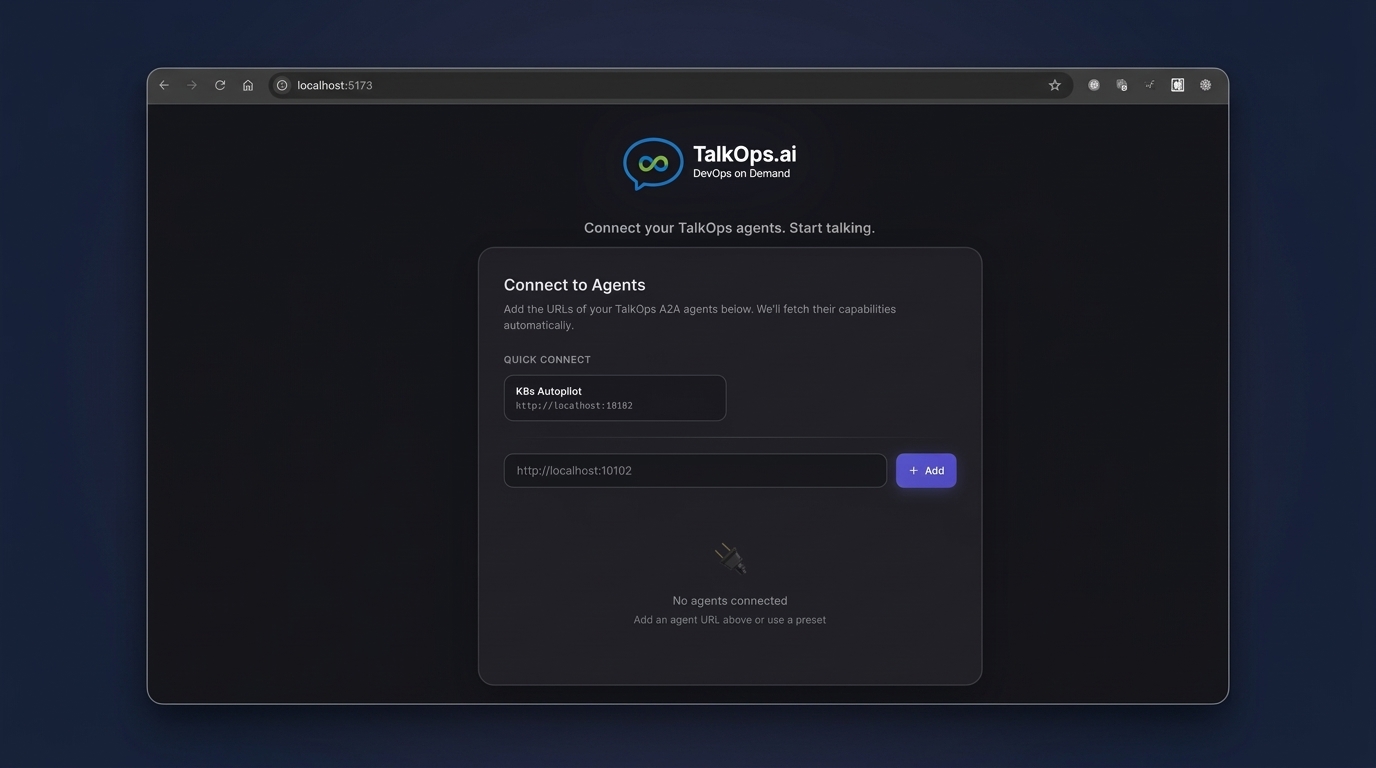
The UI shows a Quick Connect preset for K8s Autopilot at http://localhost:10102. Click it, or type the URL manually and click + Add.
Once connected, the agent card appears showing its version and capabilities (Package Management via Helm, Kubernetes Cluster Operations, Application Delivery via GitOps). You'll see three buttons:
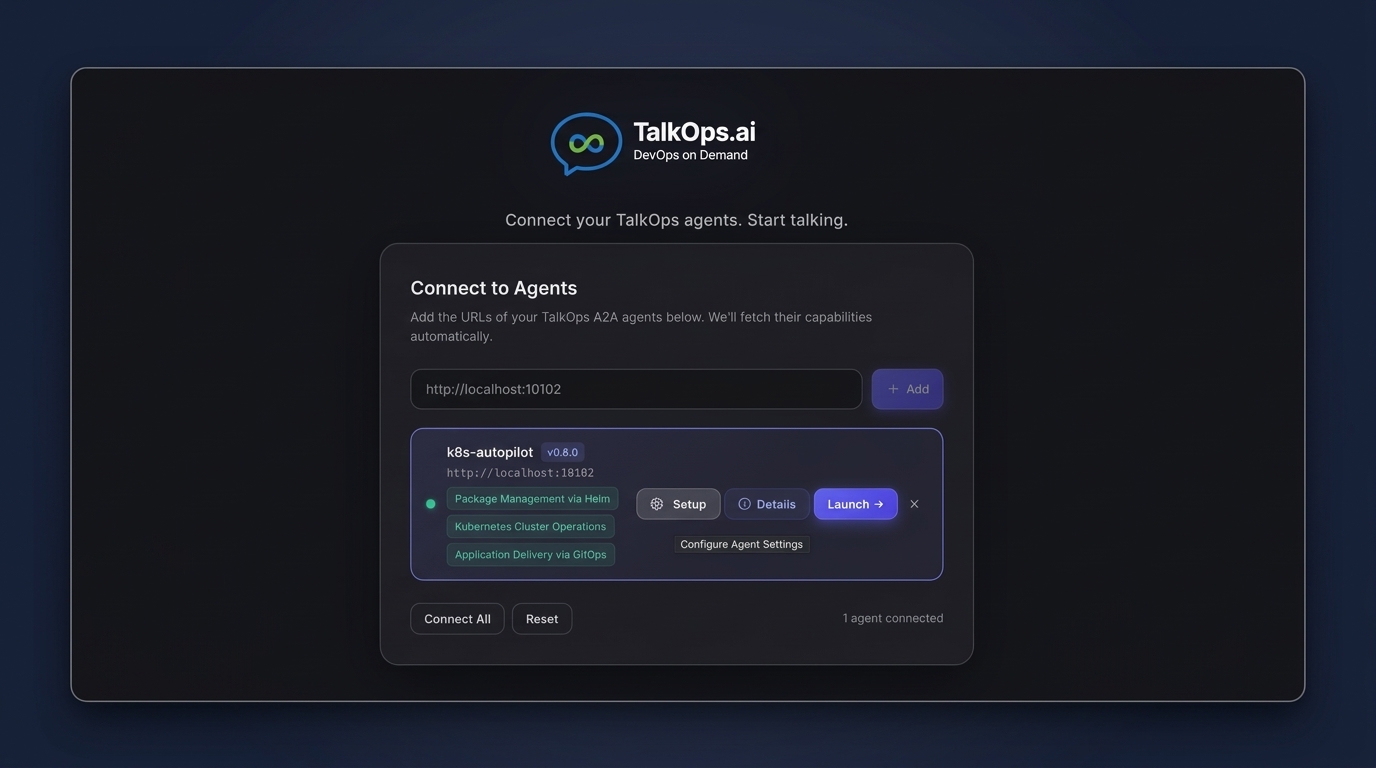
- Setup — Opens the Settings page (use this for first-time setup)
- Details — Shows agent metadata and capabilities
- Launch → — Opens the chat interface
Since this is your first time, click Setup to configure your AI provider credentials.
3. Add Your AI Provider Credentials
The Settings page opens to Auth & Keys. This is where you manage API keys for all supported providers:
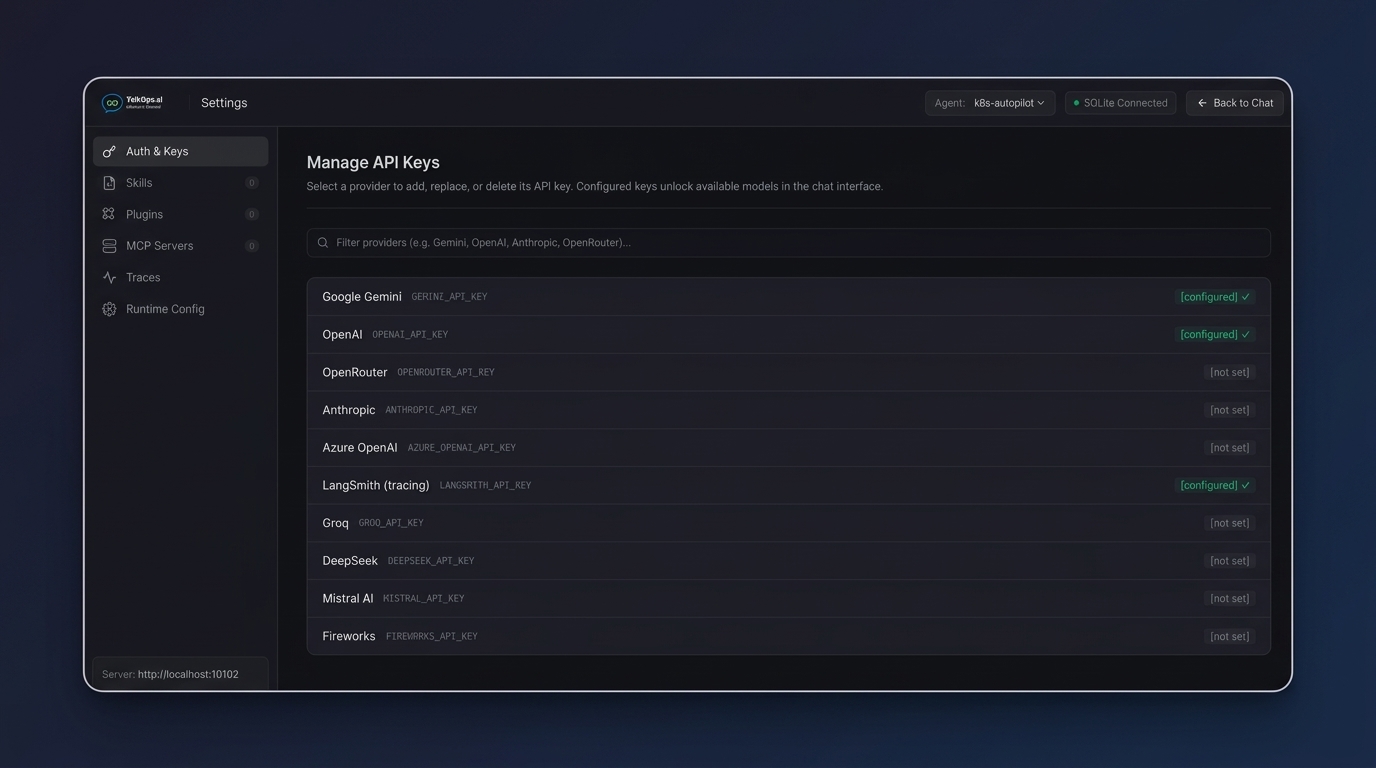
Click on a provider row to add or replace its API key. Each provider shows its status: [configured] ✓ (key set and ready) or [not set] (no key).
To get started, configure at least one:
| Provider | What to Set | Where to Get a Key |
|---|---|---|
| Google Gemini | GEMINI_API_KEY | Google AI Studio |
| OpenAI | OPENAI_API_KEY | OpenAI Platform |
| Anthropic | ANTHROPIC_API_KEY | Anthropic Console |
k8s-autopilot supports 20+ providers including OpenRouter, Azure OpenAI, Groq, DeepSeek, Mistral AI, Fireworks, and more. See Model Providers for the full list.
You can switch models and providers at any time from Settings — no restart needed. Configured keys take effect immediately.
4. Go Back and Launch
Click ← Back to Chat in the top right corner of Settings, then click Launch → on the agent card to open the chat interface.
5. Give It a Task
Type a prompt in the chat:
List all pods in the default namespace and tell me if any are unhealthy
k8s-autopilot reads your intent, routes to the right operator (K8s Operator in this case), connects to your cluster via MCP, and returns the results. For anything that could change state, it shows a plan and asks for your approval first.
Settings Reference
The Settings sidebar has six panels:
Auth & Keys
Manage API keys for all AI providers. Select a provider to add, replace, or delete its key. Configured keys unlock the corresponding models in the chat interface. You can filter providers by name using the search bar at the top.
Skills
View and manage operational skills loaded by each operator. Skills are step-by-step playbooks that tell operators how to handle specific workflows (Helm installations, ArgoCD deployments, etc.).
Plugins
Browse the plugin marketplace and install community or team plugins. Each plugin can add skills, sub-agents, and MCP server connections. See Plugins.
MCP Servers
View, add, and manage MCP tool server connections. Each server provides a set of tools that operators use to interact with your infrastructure. You can probe server status, enable/disable individual servers, and add custom MCP-compliant servers. See MCP Servers.
Traces
Configure LangSmith tracing for agent execution monitoring:
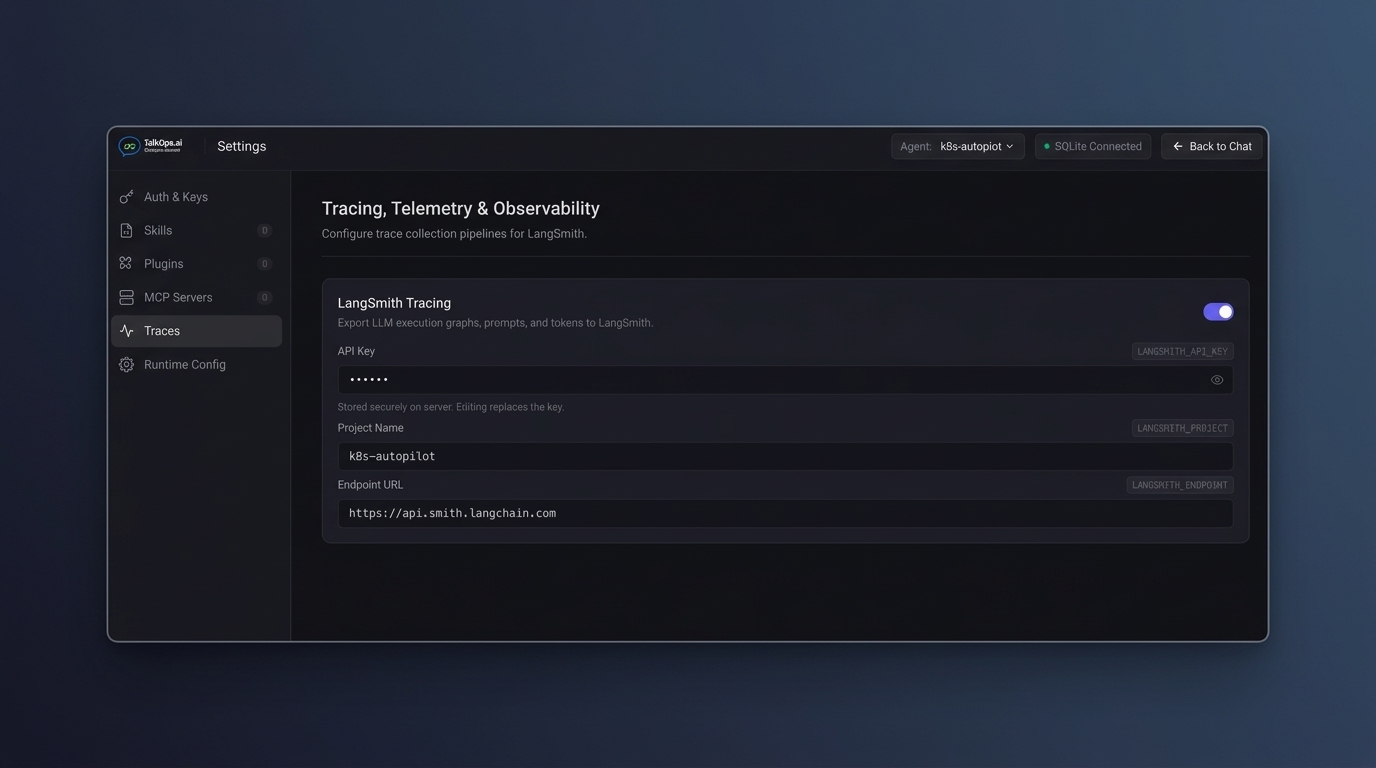
- LangSmith Tracing toggle — enable/disable tracing
- API Key — your LangSmith API key (stored securely on the server)
- Project Name — the LangSmith project to send traces to (default:
k8s-autopilot) - Endpoint URL — the LangSmith API endpoint (default:
https://api.smith.langchain.com)
Runtime Config
Configure backend storage, cluster connectivity, and system parameters:
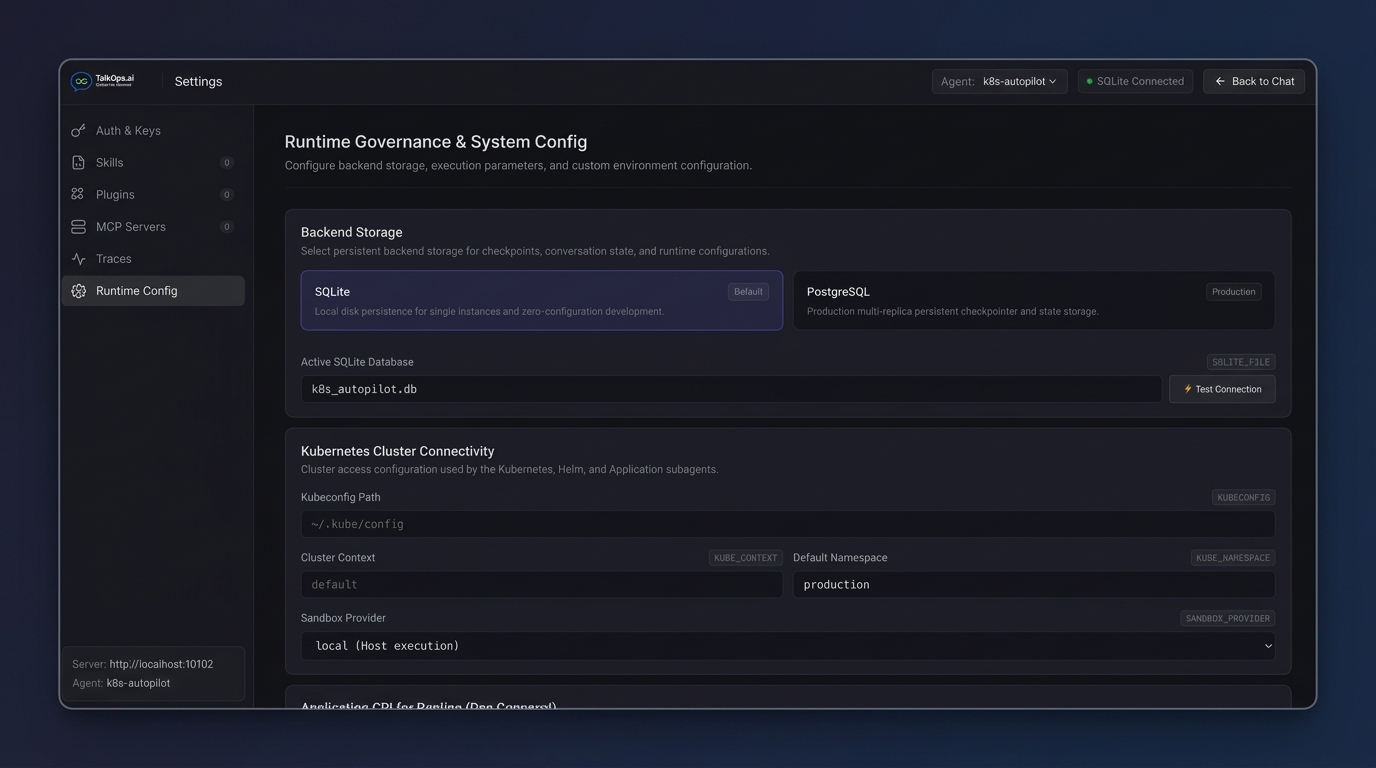
- Backend Storage — Choose between SQLite (default, zero-config) and PostgreSQL (production, multi-replica). You can hot-swap between them with a Test Connection button.
- Kubernetes Cluster Connectivity — Set the kubeconfig path, cluster context, default namespace, and sandbox provider. These are used by the Kubernetes, Helm, and Application operators.
- Approval & Governance — Configure approval mode (Manual, Auto, YOLO) and compaction settings.
- Integration Endpoints — Set URLs for Prometheus, Alertmanager, Loki, Tempo, ArgoCD, and Traefik.
- Custom Environment Variables — Add arbitrary key-value pairs that are injected into the agent's runtime environment.
See Configuration for the full reference.
Managing the Stack
The install script also supports lifecycle commands:
# View logs
docker compose -f ~/.k8s-autopilot/docker-compose.yml logs -f

# Stop the stack
docker compose -f ~/.k8s-autopilot/docker-compose.yml down

# Restart
docker compose -f ~/.k8s-autopilot/docker-compose.yml up -d

# Update to latest
curl -LsSf https://raw.githubusercontent.com/talkops-ai/k8s-autopilot/main/scripts/install.sh | bash

# Check status
curl -LsSf https://raw.githubusercontent.com/talkops-ai/k8s-autopilot/main/scripts/install.sh | bash -s -- --status

# Uninstall
curl -LsSf https://raw.githubusercontent.com/talkops-ai/k8s-autopilot/main/scripts/install.sh | bash -s -- --uninstall
Manual Docker Compose Setup
If you prefer to set things up manually instead of using the installer:
1. Create a Project Directory
mkdir k8s-autopilot && cd k8s-autopilot
2. Download the Compose File and Env Template
curl -LsSf https://raw.githubusercontent.com/talkops-ai/k8s-autopilot/main/docker-compose.yml -o docker-compose.yml
curl -LsSf https://raw.githubusercontent.com/talkops-ai/k8s-autopilot/main/.env.example -o .env
3. Edit the .env File
Open .env and set the values for your environment.
Required — at least one AI provider API key:
# Pick one provider and set its API key.
# The agent uses this key to talk to the LLM.
GOOGLE_API_KEY=your_google_api_key_here     # Google Gemini (also accepts GEMINI_API_KEY)
# OPENAI_API_KEY=your_openai_key_here       # OpenAI
# ANTHROPIC_API_KEY=your_anthropic_key_here  # Anthropic
You only need one API key to get started. Additional providers can be added later from Settings → Auth & Keys in the UI — no restart needed.
Model selection (optional):
# Which model to use. If not set, defaults to gemini-3.7-flash.
# Format: just the model name — the provider is auto-detected from the API key.
MODEL=gemini-3.7-flash
MODEL_PROVIDER=google_genai       # Also accepts legacy alias: LLM_PROVIDER

# Reasoning effort — controls how much "thinking" the model does.
# Options: low, medium, high, max
REASONING_EFFORT=medium
GitHub integration (optional):
GITHUB_PERSONAL_ACCESS_TOKEN=your_github_pat_with_repo_scope
Observability endpoints (optional — defaults work for in-cluster setups):
PROMETHEUS_BASE_URL=http://localhost:9090         # Also synced as PROMETHEUS_URL
ALERTMANAGER_BASE_URL=http://localhost:9093
LOKI_URL=http://localhost:3100
TEMPO_BASE_URL=http://localhost:3200
ArgoCD (optional):
ARGOCD_SERVER_URL=https://argocd-server.argocd.svc:443
ARGOCD_AUTH_TOKEN=your_argocd_auth_token_here
Tracing (optional):
LANGCHAIN_TRACING_V2=false                           # Set to true to enable
LANGCHAIN_API_KEY=your_langsmith_key_here             # Also accepts LANGSMITH_API_KEY
LANGSMITH_PROJECT=k8s-autopilot                       # LangSmith project name
4. Start the Containers
docker compose up -d
Open http://localhost:8888 and follow the connect flow above.
The compose file starts two services: the k8s-autopilot agent daemon (port 10102) and the TalkOps web UI (port 8888). All 11 built-in MCP servers run in-process via stdio transport — no sidecar containers needed.
Everything set in .env serves as an initial default. You can override any setting from the Settings UI at runtime without restarting.
Using PostgreSQL for Persistent Storage
By default, k8s-autopilot uses SQLite for checkpoints, conversation state, and configuration — zero extra setup needed.
For production, multi-replica, or team deployments, add a PostgreSQL service to your docker-compose.yml:
services:
  # ... existing k8s-autopilot and talkops-ui services ...

  postgres:
    image: postgres:16-alpine
    container_name: k8s-autopilot-postgres
    environment:
      - POSTGRES_USER=autopilot
      - POSTGRES_PASSWORD=autopilot
      - POSTGRES_DB=k8s_autopilot
    ports:
      - "5432:5432"
    volumes:
      - pgdata:/var/lib/postgresql/data
    restart: unless-stopped
    networks:
      - k8s-autopilot-net

volumes:
  pgdata:
Then add these environment variables to the k8s-autopilot service (or your .env file):
POSTGRES_URI=postgresql://autopilot:autopilot@postgres:5432/k8s_autopilot
CHECKPOINT_BACKEND=postgres
The agent auto-detects the backend: if POSTGRES_URI (or DATABASE_URL) is set, it uses PostgreSQL; otherwise it falls back to SQLite. Both the config store and the LangGraph checkpointer use the same backend.
You can switch between SQLite and PostgreSQL at runtime from Settings → Runtime Config → Backend Storage — click Test Connection before committing the switch.
Do I Need All MCP Servers Running?
No. k8s-autopilot works with whatever subset is available. If a server isn't configured or can't connect, the relevant operator will tell you that specific capability is unavailable — the rest of the system keeps working normally.
What's Next
- Configuration Reference — Environment variables, LLM tiers, and settings resolution.
- Model Providers — 20+ providers and custom base URLs.
- Operators & Sub-agents — Detailed capabilities of each domain operator.
- Approval Modes & Governance — How the approval system protects your infrastructure.
- Plugins & Marketplace — Marketplace, plugin formats, and extending the agent.